Now we’ve got a notification when a new post is added, we need to figure out who to notify about it. This is the process I’ve come up with:
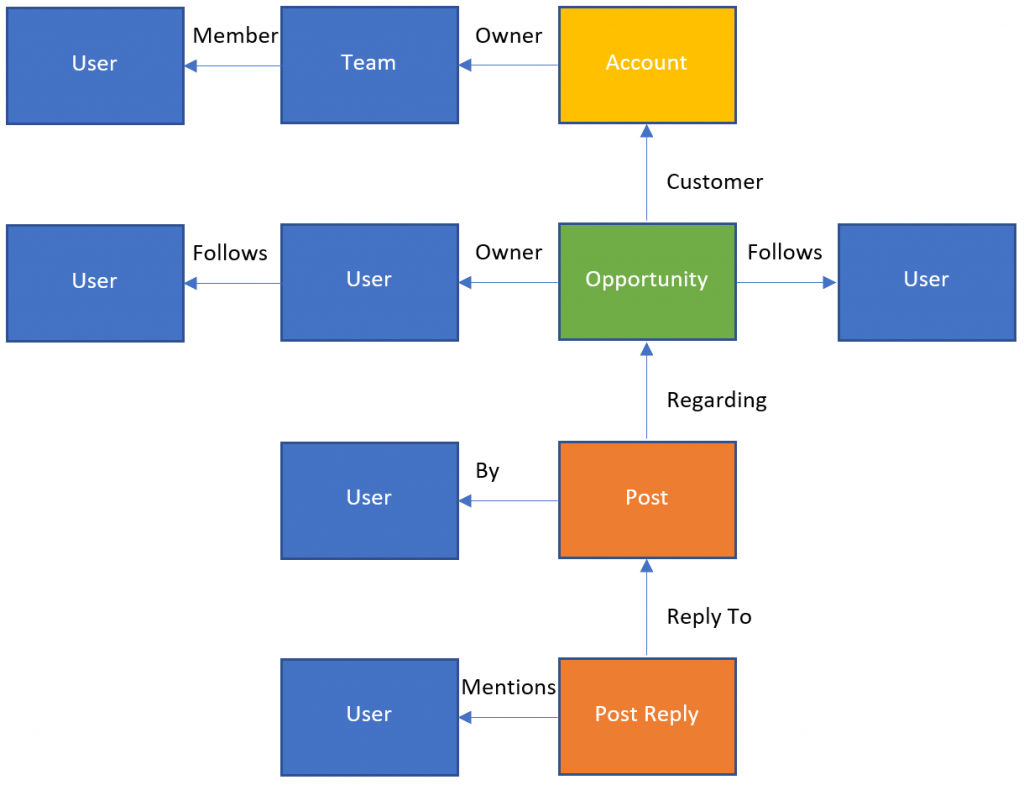
In this example, someone has just written a reply to a post (the Post Reply entity at the bottom). From there we’re going to follow the relationships to find people that might be interested in the new post:
- Any users explicitly mentioned in the post
- The author of the post that’s being replied to (and any other replies in the same thread)
- The owner of the record that the post is written on
That sequence will be the same regardless of the type of record that the post is on.
The key record type for Data8 is the account, as this is what most of our processes revolve around. If the post wasn’t on an account record, we’ll look for any relationships back to an account and repeat.
If any of the owners we’ve found are teams, we’ll expand that out into a list of individual users.
This should give us a good list of users that we should notify automatically. However, there may be cases where a user is particularly interested in a record they’re not linked to. To allow people to subscribe to notifications I’ll also look for users that follow any of the records we’ve found.
We can also use follows to handle users picking up notifications for another user while they are on leave. In this way the user that is covering their work only needs to follow one user record rather than each individual account record.
Connecting to CDS
To run any of this logic, the first thing we need to do is connect to CDS from our bot. We’re running the bot on ASP.NET Core, so we’ll need to use the alpha CDS package Microsoft.Powerplatform.Cds.Client
Because we’re connecting to CDS from an application, we’re going to use server-to-server authentication using the same client ID and secret that we used in part 4 to authenticate to the Microsoft Graph API.
Getting Post Details
Once we’ve connected, we need to get the details of the post that’s just been written. This is the starting point for our wander around the relationships.
Rather than load the new post from CDS, we could just extract it from the request context that is posted to our webhook and save ourselves an extra request. The body of the post is stored in the text attribute. However, for some automated posts, this will be in an XML format rather than plain text. The XML document just references a standard template and gives the values used within it. To get the full text we’re going to need to use the RetrieveRecordWall message which expands it out for us.
Post Mentions
Any records that are mentioned in the post are embedded into the post text, so this post:

is stored as:
Hi @[8,A26CF3A6-F273-EA11-A811-000D3AB398A4,"Mark Carrington"], I've just created this new record for @[1,1AF1DA21-80AE-EA11-A812-000D3AB393DC,"Data8"]We can parse these out to get the ObjectTypeCode and guid of each mentioned record. We’ll then use these as starting points for finding interested users again.
Related Users
From the record that the post is written on, we find possible users by finding relationships to users or teams. However, I’ll ignore the createdby and modifiedby attributes so that accounts that regularly do bulk imports are not swamped by notifications forever.
Related Accounts
We can also use the same approach to find relationships from our starting entity to account entities. From any account we find we’ll apply the same logic recursively, finding more users and more accounts.
Follows
As we’ve run through the process above, we’ve built up a list of records (the starting record, accounts, users and teams). As a final step we’ll find users that follow any of these records and add those users into our list to notify.
Sending the notification
Now we’ve got the details of the message we want to send out (the body of the post that’s been written) and a list of usernames to send it to. When we had a look at adding our bot to users we stored the username and all the related details we needed to send a message. Now we’ll pull those details back out and use our proactive messaging code to send a message out to each user.

Success! I’ve got a message going all the way from D365 to my bot and on to Teams!
Of course, actually formatting the data we’ve retrieved so far into a usable message is a whole other task, and I’ll take a look at that next time.
Show me the code!
I haven’t put any code into this post, simply because there’s a lot of it! It’s all going to be available on my GitHub shortly though.
Some interesting points to note that I found as I was building this though:
- The sample EchoBot app I’ve been basing my app on is built on .NET Core 2.1. The alpha CDS SDK requires at least .NET Core 3.0. When I added the package reference it didn’t give any error, but it restored the .NET Framework version, which then caused runtime errors when the app started up. I needed to upgrade to .NET Core 3.0 (or 3.1), which triggered some other breaking changes:
- Using MVC in .NET Core 3.1 requires some minor changes in the setup. It gives compiler warnings to indicate what’s needed though
- An MVC action can have a
JObjectparameter in ASP.NET Core 2.1, but this gives a 400 error in ASP.NET Core 3.1. This needed theMicrosoft.AspNetCore.Mvc.NewtonsoftJsonpackage
With these changes the original services.AddMvc() call needed to become
services
    .AddMvc(option => option.EnableEndpointRouting = false)
    .AddNewtonsoftJson();
Debugging
Of course, I didn’t get all this right first time! In the System Jobs entity in D365 there was an entry for each failed webhook notification which didn’t give too much information, but it did give the HTTP status code which was helpful to diagnose some of the problems I hit. When I hadn’t re-enabled MVC after upgrading to ASP.NET Core 3.1 for example, I got a 404 error as it couldn’t find the expected endpoint. I also got a 400 error when I hadn’t added the NewtonsoftJson package to deserialize the JObject parameter.
For handling other coding errors that resulted in a 500 error however, being able to attach a debugger directly to the app service running in Azure is a fantastic feature. This is such a massive timesaver! It works flawlessly, and so smoothly you could (almost) imagine you were debugging locally. If you haven’t used this feature before I would certainly recommend it.
One thought on “Creating a bot pt. 6 – Posts to Users”