Now I’ve got my bot sending notifications to Teams, but the display of the messages left something to be desired. This is where Adaptive Cards comes in.
Adaptive Cards are a declarative user interface system that you can use across most bot channels. What does this mean? Possibly the simplest way to understand it is to look at the online interactive designer.
With the designer you can drag & drop user interface elements and see a JSON document describing it. You can then switch between different host apps (Teams, web chat etc.) to see how that same card would be rendered in each system. You don’t have to know anything about how each app works, you just describe what you want in your card and it takes care of how to display it.
Building a dynamic card
I need to get some dynamic data into my card before I send it. Ideally I want to send each user we’ve decided are interested:
- a copy of the new post
- who wrote the post
- a link to the record it was posted on
- some details of why each user is receiving the notification
- an option to reply to the post
There’s a few ways to build this:
- build the JSON string manually for each card
- use the card templating SDK
- use the object model from the SDK
The templating SDK looked appealing, and is the way demonstrated in the designer. I couldn’t get quite the results I wanted with this though. In the end I built up each card using the SDK object model, which gave me complete freedom to customise each card as I needed.
Sending a card
Once you’ve got a card built, you can send it to the user as an attachment to a message:
var card = new AdaptiveCard { ... };

var activity = new Activity
{
    Type = ActivityTypes.Message,
    Conversation = new ConversationAccount { Id = ... },
    Attachments = new List<Attachment>
    {
        new Attachment
        {
            ContentType = AdaptiveCard.ContentType,
            Content = card
        }
    }
};
Validation errors
I had quite a few errors when I tried to send the message, as it does some extra validation of the card structure as it sends it.
In some cases you might get an exception as you try to send the message, and you can get some helpful details from the error message to help fix it.
In other cases the message will send, but the card appears as a blank white rectangle. These were harder to diagnose, but were generally because of some malformed JSON when I was trying other ways of generating the card.
Interactive elements
One of the things I really like about Adaptive Cards is the option to make them interactive. The main bit of information I want to get across in the card is the content of the new post, but I can add buttons (“actions” in Adaptive Card speak) to show extra details if the user is interested. You can also add input elements to get information from the user in a structured way to send back to the bot.
Finished result
From my first basic attempt of sending a simple message:

I’ve now got a prettier card layout:
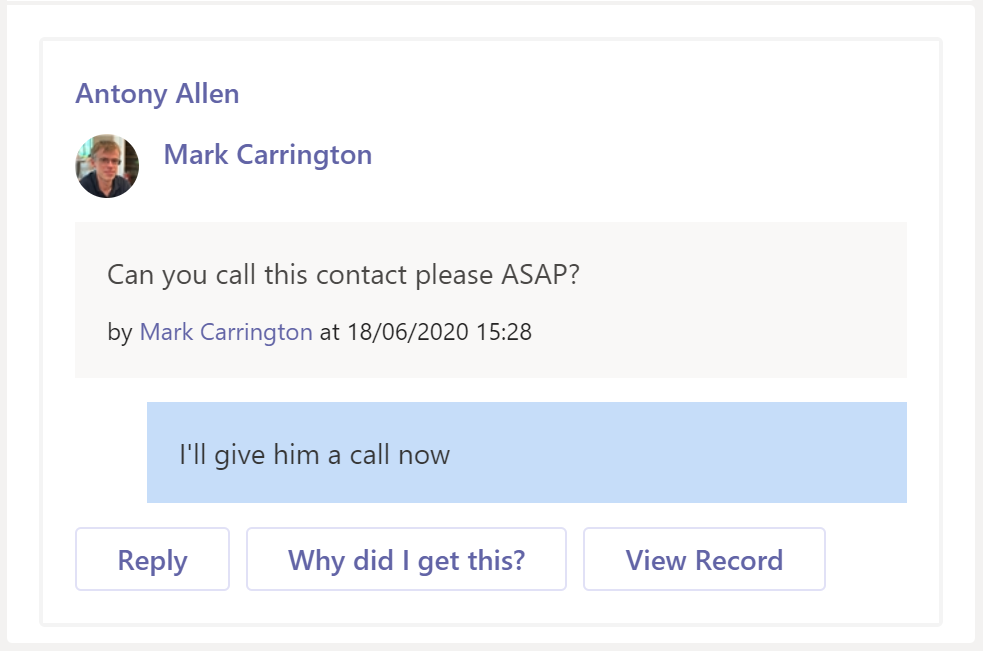
The card has:
- a simple link to the record the post was on
- a link to the user that posted the message
- the contents of the new post, and the post it’s a reply to
It’s also got three actions that are shown as buttons along the bottom:
- Sending a reply – this opens an extra area to enter the comment and send it
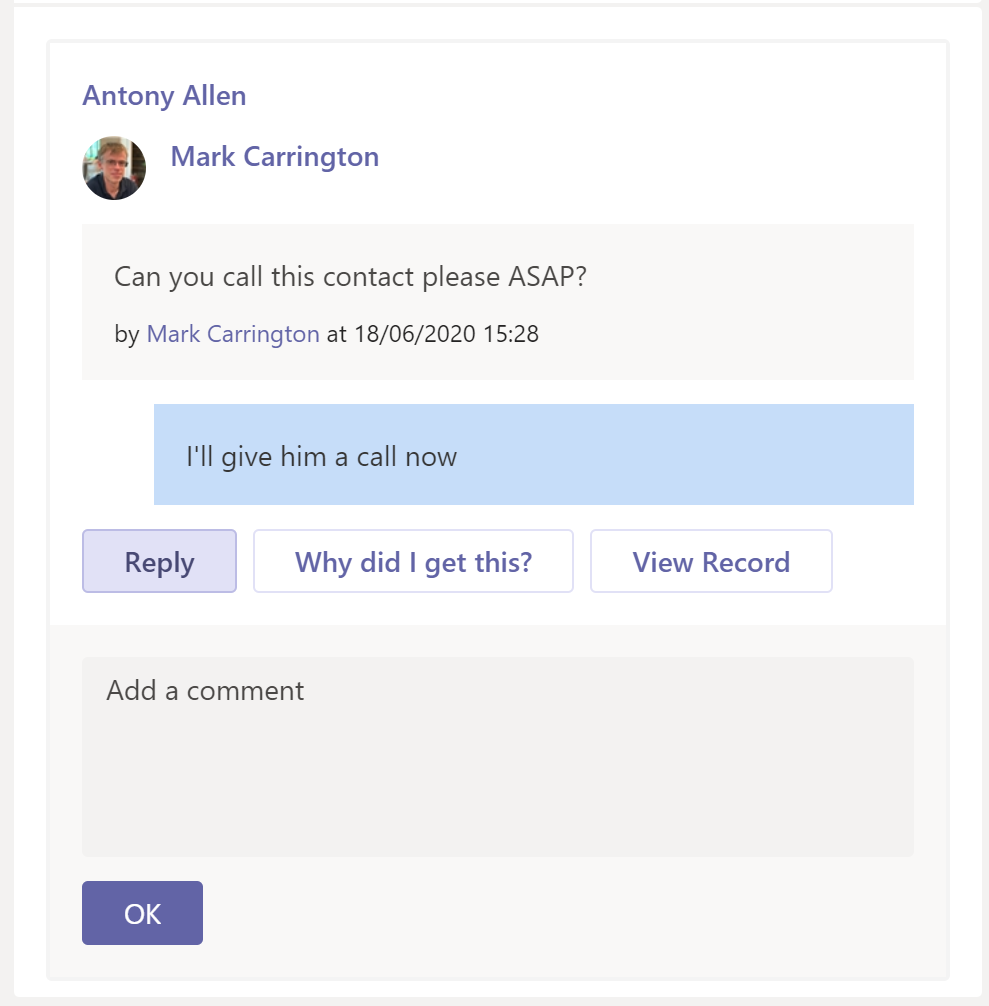
- an option to describe to the user why they received the notification
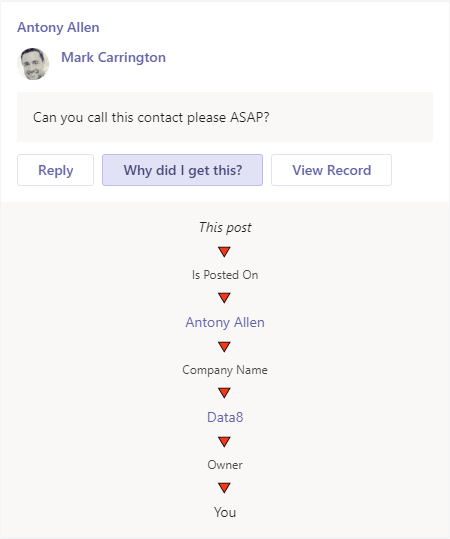
This should help reduce any possible complaints from users of receiving notifications that they are not interested in. The chain shown here is the part I couldn’t generate using the templating SDK. It’s generated from the graph of records that the bot navigated around while it was determining who to send the notification to.
- a link to open the record that the message was posted on
Generating links
Wherever possible I’ve tried to make everything in the card a link to the D365 record it relates to. To generate the link I’ve combined a few bits of information:
- The domain name of the instance that the notification came from – this comes from the web hook notification in the
x-ms-dynamics-organizationheader - The name or code of the entity type
- The guid of the record
These can be combined in a URL in the form:
https://{domain}/main.aspx?etn={entity-type-name}&id={guid}&pagetype=entityrecordor
https://{domain}/main.aspx?etc={entity-type-code}&id={guid}&pagetype=entityrecordIn most cases we’ll have the entity type name (account, contact etc.), but in a few cases (e.g. when parsing a link out of the post body) we have the entity type code (1 for account, 8 for user etc.)
Next steps
I’m quite happy with how this looks now, it presents all the required information in a simple to read way and makes it easy for the user to interact with.
The next stage I’ll look at is handling the responses from the user and pushing them back into D365.