If you’ve tried reporting on your Dataverse / Dynamics 365 data using Power BI, you’ll probably have noticed you don’t get the labels associated with any optionset (now “Choice”) fields in your data. There are ways around this such as using the PowerBI OptionSet Assistant solution. In this post I’ll show how to get this data without having to install anything into your environment. It’s also completed automated with no manual updating of labels as you add or change them.
TLDR: Use the TDS Endpoint to create a lookup table while still using Import mode for your fact tables.
Power BI Query Modes
Power BI offers two query modes – Import and DirectQuery. Microsoft recommends that you use the Import mode wherever possible for the best performance of your reports. Import mode also gives us some functionality that is disabled in DirectQuery mode, such as automatic date hierarchies.
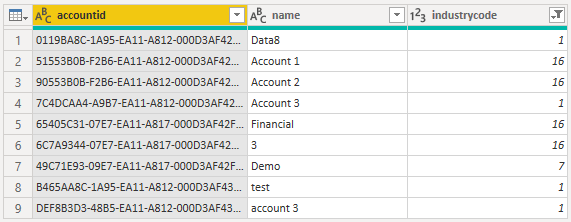
When using the Dataverse connection though, Import mode only gives numeric values for your optionset columns, not the human-readable labels.
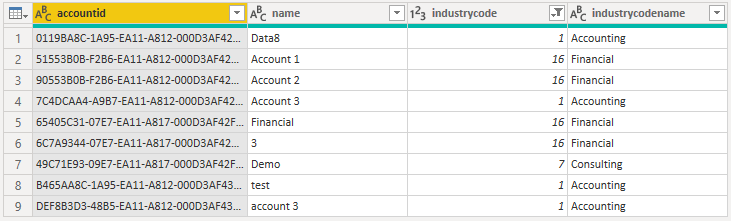
With the DirectQuery mode you can get the number and associated name. In multi-lingual deployments you even get the name in the language of the user making the query:
Mixed Mode
What we really want to do is use these two modes together to get the best of both worlds.
Firstly you’ll need to enable the TDS Endpoint for your environment in order to use the DirectQuery mode part of the solution.
Adding the Import mode table
If you’ve already got an Import mode table that you want to add labels to, skip over this section.
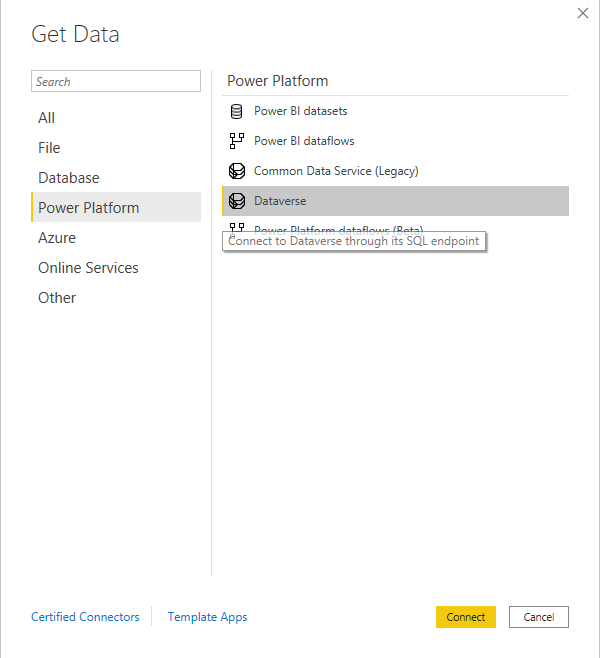
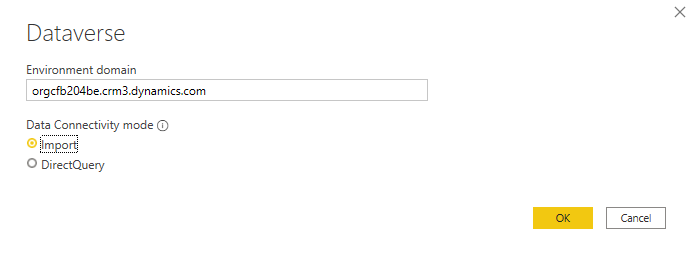
Starting from a new report, click “Get data” and select the “Dataverse” connector:
Enter the domain for your instance, ensure “Import” mode is selected and click OK:
Select the table that includes your optionset column and click Transform Data:

Do any further changes you need to your data such as removing columns or filtering the data, then click Close & Apply to add it to your report.
Creating the lookup table with DirectQuery
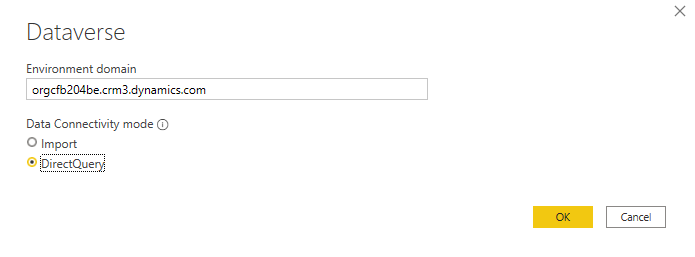
Click “Get data” again, select the Dataverse connector and enter the same URL. This time though, select the DirectQuery mode:
Select the same table again and click Transform Data.
This time we’re going to use Power Query to reduce this table down to a simple lookup of optionset values to their associated labels.
- To start off with, remove all the other columns. Select the optionset value and label columns, click the dropdown arrow for “Remove Columns” in the ribbon, then click “Remove Other Columns”
- Next, remove any rows that don’t have a value for these columns. Click the dropdown arrow at the top of the value column, untick the “(null)” value and click OK
- Finally, we only want one row for each value. Select the two columns and click “Group By” in the ribbon. This will automatically create a new “Count” column as well to show how many records had that value, but we’re not interested in that so you can remove this in the formula editor. For example, if the formula was:
= Table.Group(#"Filtered Rows", {"industrycode", "industrycodename"}, {{"Count", each Table.RowCount(_), Int64.Type}})
you can remove the last part so it becomes:= Table.Group(#"Filtered Rows", {"industrycode", "industrycodename"})
It can be difficult to find the correct columns to use in the first step, especially in a large table like account. You might find it easier to use the “Advanced Editor” option on the “View” tab of the ribbon. Here you can simply paste in the following query, changing the URL, table and column names as appropriate:
let
    Source = CommonDataService.Database("orgcfb204be.crm3.dynamics.com"),
    dbo_account = Source{[Schema="dbo",Item="account"]}[Data],
    #"Removed Other Columns" = Table.SelectColumns(dbo_account,{"industrycode", "industrycodename"}),
    #"Filtered Rows" = Table.SelectRows(#"Removed Other Columns", each ([industrycode] <> null)),
    Distinct = Table.Distinct(#"Filtered Rows")
in
    Distinct
In this version I’ve used the Distinct operation instead of Group for the final step, but it comes to the same result.
Finally, make sure you give this new table a useful name. By default it will have been called account (2) which isn’t very helpful. Edit the name in the top right (something like IndustryCodeLookup), then click Close & Apply again.
Joining the tables
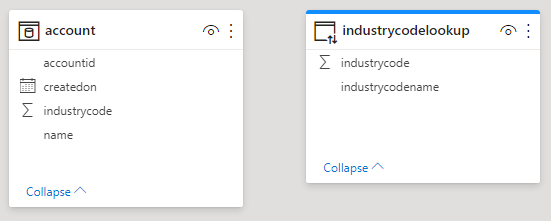
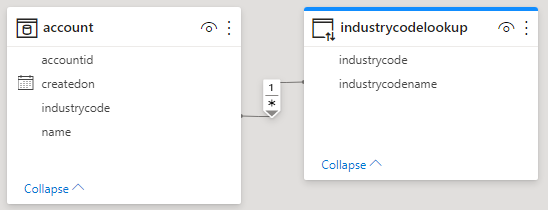
The model view will now look like:
The next step we need to do is join the two tables by dragging the industrycode field from the lookup table to the main account fact table. You’ll see the “Create relationship” dialog:
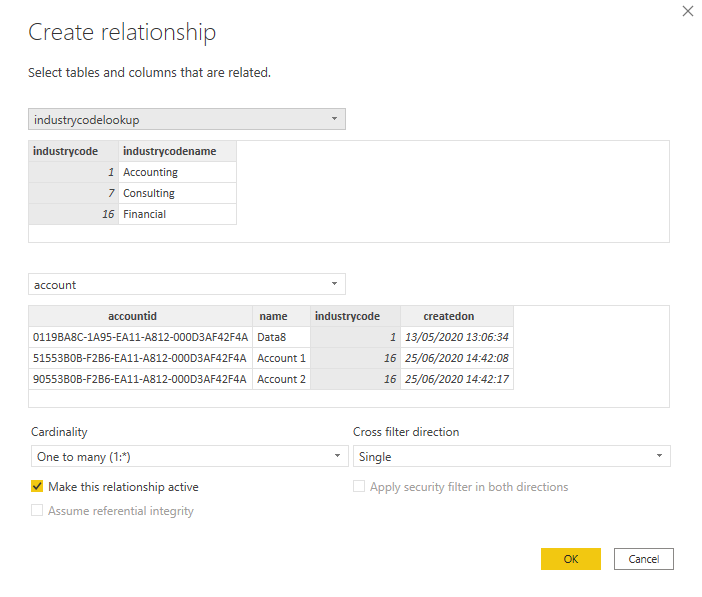
Click OK on this and you should now see the two tables being joined:
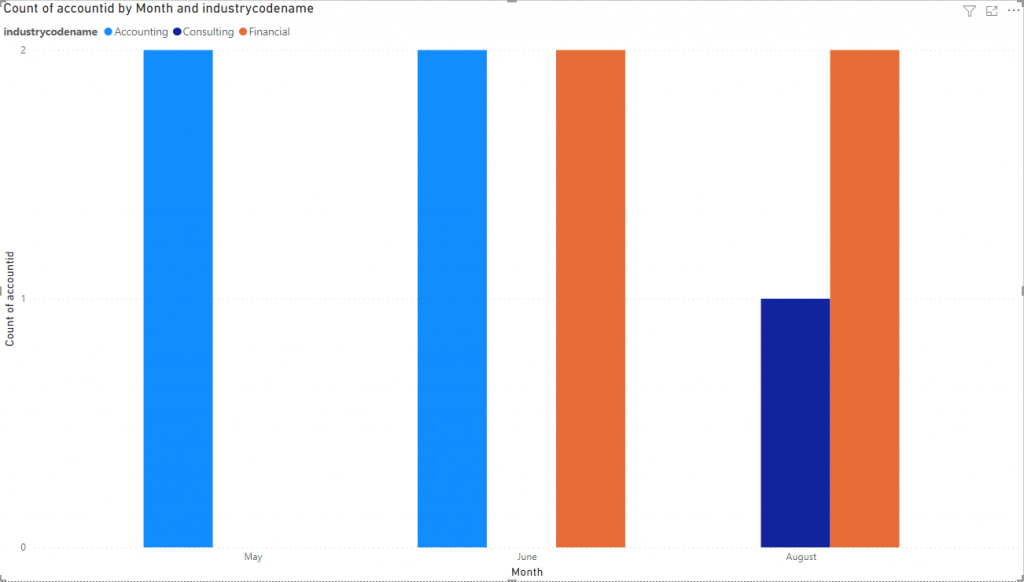
Building the report
Now we’ve got the two tables linked together we can use them in the report. For example, drop on a clustered column chart visual, put the createdon field from the main account table into the Axis, the industrycodename field from the lookup table into the Legend, and the accountid field into the Values.
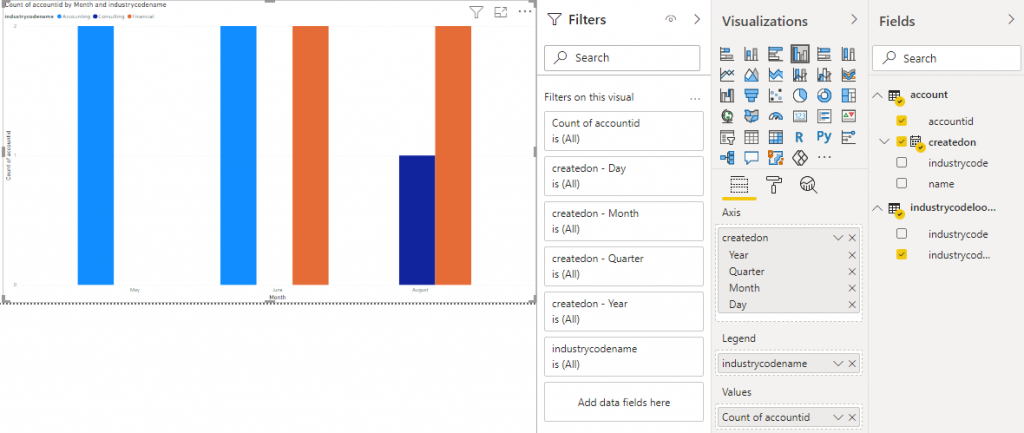
Because the account table is using Import mode you still get an automatic date hierarchy created for the createdon field, but we now get an automatic lookup for the correct labels for the optionset fields too.
Because the labels are generated automatically from your data you don’t need to worry about keeping a separate lookup table up to date – any changes you make in the make.powerapps.com portal will be immediately reflected in your report.
I find that using the Dataverse connector in Import mode, I do see the option set labels fine. Does this perhaps apply to just local option sets?
Strange, I’ve never seen it import the labels and there’s plenty of other people having a similar problem (hence why the Power BI OptionSet Assistant solution exists I guess), but I’ve just tried it again and boom, the labels came through! Not sure if something’s changed recently or I’ve just been blind to them before.
Still, this could be a useful way of getting localised labels based on the current user for multi-lingual deployments while still using Import mode for the main fact tables.
This did not work for me. I have a custom table, and one of the columns pulls values from a choice. I have tried both import and Direct Query approach, it didn’t work. If anyone has a different approach to making this work, it will be greatly appreciated.
Hello Mark,
And all there is an issue were the TDS endpoint doesn’t return choice (optionset) labels if they haven’t been explicitly published. Publish has been for the most part removed as a requirement. However, in this case the TDS endpoint is depending on the stringmap table which still requires publish to update.
For now the workaround is click publish all in the solution explorer screen.
We have a long term task to remove this need but it is going to take time to land.
Hope this helps,
Rich Dickinson – PM Microsoft Dataverse
That’s great, thanks for the details Rich!
I used to use the Option Set Assistant back with the old Dynamics connector as that certainly had the issue you’ve described of only pulling in the values rather than the labels. Thankfully, since then, the CDS and Dataverse connectors pull everything in, which certainly saves a lot of time and hassle!
OMG, this is a lifesaver (with a twist)! I have been struggling for days with what to do with this issue, including trying to gain access to the data source through XrmToolbox. I have been working on a Power BI data model started by someone else who used the OAuth method for connecting. It only returns the codes, not the labels.
So I tried connecting to Dataverse using the DirectQuery method and got a SQL error and was unable to view the data. Given what the others said above, I tried one more time with Dataverse using Import Mode and Boom! I got access to all the tables, and the tables with optionset/picklist codes now have the text labels as well. No extra queries, no mixed mode needed. Thank you, thank you, thank you!
Guess what, two steps forward, one step back. Using the Export to Azure Synapse we are back too square one. No labels for choice/optionsets.
Fun.
So, back to mixed mode or use the XRMToolbox, PBI Optionset Assistant to create the table and sync it to Synapse with the other tables.
Great info!
Thanks.
I was able to solve the problem by publishing All Customizations via the Solution.
After this I got the option set names in Power BI
/Erik
Thanks a lot! In my case, it doesn’t matter whether I used direct query or import mode, it’s the connector Dataverse which makes the difference. We previously used Odata connector and this custom label field didn’t get imported. Once I switched to Dataverse, this field gets imported. Amazing!
I tried this and the direct query didn’t actually work – it still returned just the option values instead of the option values and option labels.
To get around it I used an API query instead then navigated through to get the option name and option value.
For anyone else having this issue the base query is in M below. Authentication is just via your org credentials (same as dataverse).
let
Source=Json.Document(Web.Contents(“[org id].crm6.dynamics.com/api/data/v9.0/GlobalOptionSetDefinitions?”)),
#”Converted to Table” = Record.ToTable(Source)
in
#”Converted to Table”
Has anyone had success with retrieving labels for Global Choice lists / Options Sets and multi-select turned on? The table, eg Account, doesn’t have a “{fieldname}codename” type field, just the field with the code in it.