As promised, I’m starting a series of blog posts covering various aspects of FetchXML and the humble <attribute> element seems like a good place to start.
The purpose of running a FetchXML query is to get some data back, and the <attribute> element defines which attributes get included in the result.
You can add as many <attribute> elements to your query as you need, and you can add them to your main <entity> and any <link-entity> elements.
<fetch>
  <entity name="account">
    <attribute name="name" />
    <attribute name="telephone1" />
    <link-entity name="contact" to="primarycontactid" from="contactid" link-type="inner">
      <attribute name="fullname" />
      <attribute name="telephone1" />
    </link-entity>
  </entity>
</fetch>
This will return the name and telephone number of accounts, and the name and number of the related primary contact.
Including all attributes
Because nothing is free, you should always include only the attributes you need in the result. It’s easy to include everything, just in case, but your queries will run noticeably slower.
If you really do want to include all the attributes, you can use the <all-attributes> element instead of lots of individual <attribute> elements to make your query easier to read. This will include the attributes from the <entity> or <link-entity> you add it to, not all the different entities in your query. If you have a query that is joining two entities and want all the attributes from both entities you’ll need an <all-attributes> element within the top-level <entity> and the <link-entity>
<fetch>
  <entity name="account">
    <attribute name="name" />
    <attribute name="telephone1" />
    <link-entity name="contact" to="primarycontactid" from="contactid" link-type="inner">
      <all-attributes />
    </link-entity>
  </entity>
</fetch>
This will return the name and telephone number of accounts, and all attributes of the related primary contact.
Aliasing columns
The results returned by a FetchXML query will return a column for each attribute. By default, those columns have the same name as the attribute. For example, the first query would produce an output like:
| name | telephone1 | contact.fullname | contact.telephone1 |
|---|---|---|---|
| Data8 Ltd | 0151 355 4555 | Mark Carrington | +44 151 355 4555 |
You can choose to change these names using aliases. This becomes more useful when we look at aggregate queries, but you can still use them for simple queries too.
<fetch>
  <entity name="account">
    <attribute name="name" alias="account" />
    <attribute name="telephone1" alias="phone" />
    <link-entity name="contact" to="primarycontactid" from="contactid" link-type="inner">
      <attribute name="fullname" alias="name" />
      <attribute name="telephone1" alias="tel" />
    </link-entity>
  </entity>
</fetch>
| account | phone | name | tel |
|---|---|---|---|
| Data8 Ltd | 0151 355 4555 | Mark Carrington | +44 151 355 4555 |
Without the aliases, the attributes retrieved from the linked entity were prefixed with the name of the entity. When you use an alias that prefix isn’t used, so you need to make sure that the alias names are unique across your query, not just within the individual entity.
Although you can apply aliases in this way, I wouldn’t recommend it simply because it makes it less obvious where the data has come from. When you execute the query the value will be wrapped in an AliasedValue object which gives this information, but why make life harder?
Aliases also don’t work well with the deprecated ExecuteFetchRequest message. If you’re using that, please look at moving to RetrieveMultiple instead. If you can’t for any reason you’ll find that aliased columns generally don’t appear in your results. The only time I’ve got them to appear is when the alias name matches another attribute name in the query, which is pretty useless. If you run a query in FetchXML Builder with the “Raw fetch result” view it uses this method, so don’t be surprised if you don’t get the expected results in there.
SQL equivalents
In SQL 4 CDS, attributes are included using the standard SELECT clause in your query. For example, the first query would be written in SQL as:
SELECT a.name,
       a.telephone1,
       c.fullname,
       c.telephone1
FROM   account AS a
       INNER JOIN
       contact AS c
       ON a.primarycontactid = c.contactid;
Aliases can be added using the AS keyword, e.g.:
SELECT a.name AS account,
       a.telephone1 AS phone,
       c.fullname AS name,
       c.telephone1 AS tel
FROM   account AS a
       INNER JOIN
       contact AS c
       ON a.primarycontactid = c.contactid;
All attributes can be included using *:
SELECT *
FROM   account AS a
       INNER JOIN
       contact AS c
       ON a.primarycontactid = c.contactid;
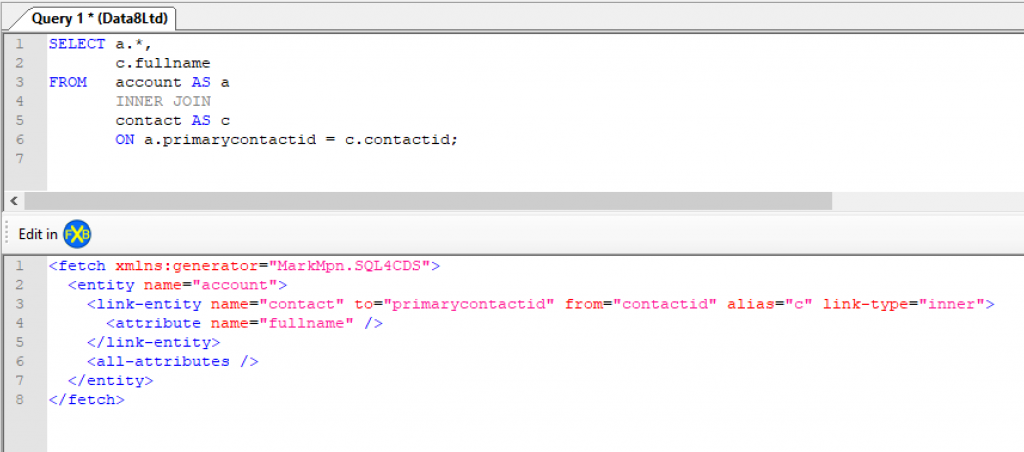
You can mix and match selecting individual attributes from some entities and all attributes from others in a join as well:
SELECT a.*,
       c.fullname
FROM   account AS a
       INNER JOIN
       contact AS c
       ON a.primarycontactid = c.contactid;
Although SQL can support much more complex SELECT clauses, performing calculations and calling functions, these are not supported in FetchXML and therefore in SQL 4 CDS. If you try to write a query in SQL 4 CDS such as:
SELECT 1 + 1
FROM   account;

SELECT dateadd(d, createdon, 1)
FROM   account;
you’ll get an error from SQL 4 CDS:
Unhandled SELECT clause: 1 + 1
Unhandled function: dateadd(d, createdon, 1)
Next time I’ll take a closer look at the <link-entity> / JOIN syntax for linking multiple entities.
4 thoughts on “Inside FetchXML pt 1 – attribute”