Before I make any progress with the real logic of my new bot, I need to get the basics set up.
I first need to create a simple bot and be able to interact with it from Teams. This is where the whole Azure Bot Framework really shines – I need to know just about nothing about all these different moving parts to get started.
First, in the Azure portal, I created a new resource group to keep everything I’m going to need in one place. Then I click Add Resource and just type in “Bot”. You get quite a few options to choose from:
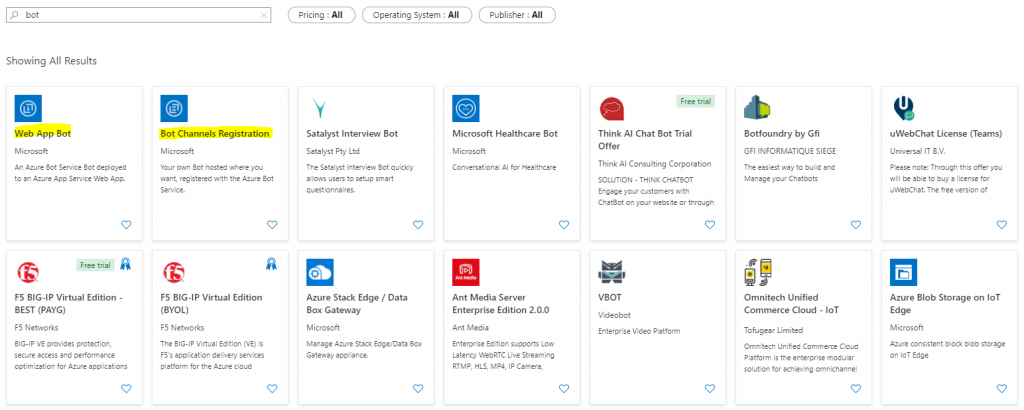
Creating the Bot
I want to build my own bot rather than starting from one of the third-party ones on offer, so I’m going to pick between these first two options I’ve highlighted. After a quick bit of research, the different options are:
- Web App Bot hosts the bot within an automatically-created App Service resource as well as registering it with the Azure Bot Framework
- Bot Channels Registration registers a bot you’ve already created and hosted elsewhere
I’m all in favour of not having to worry about the underlying infrastructure wherever I can, so I’ve gone for the Web App Bot option.
I’ve got to pick a few standard options when I’m creating the bot – all the usual things of what to call it and what region to host it in, a pricing tier (the free one will be fine for now), and, handily, a template for my bot. I’ve gone with the simple Echo bot for now, as I’m not planning on using natural language input from users at least to start with.
After creating the bot I’ve ended up with three new resources in my resource group:
- App Service Plan to run my bot in
- App Service to host my bot
- Web App Bot to register my bot with the Bot Framework
It’s worth noting that although I used the free tier for the bot registration, the App Service Plan it’s created to host it is at the S1 pricing tier, which is going to cost me about £32 per month. Not the end of the world for a real scenario, but I’m only playing for the moment so the next thing I’m going to do is scale that down to the F1 (free) tier.
Quick Test
I haven’t written any code yet but I’d like to see it working before I start to change anything. The simplest way is to head over to the Web App Bot resource and click on the “Test in Web Chat” option. This gives me a quick and easy way to interact with my bot.
As expected, I can type in messages and the sample bot simply echos them back to me:
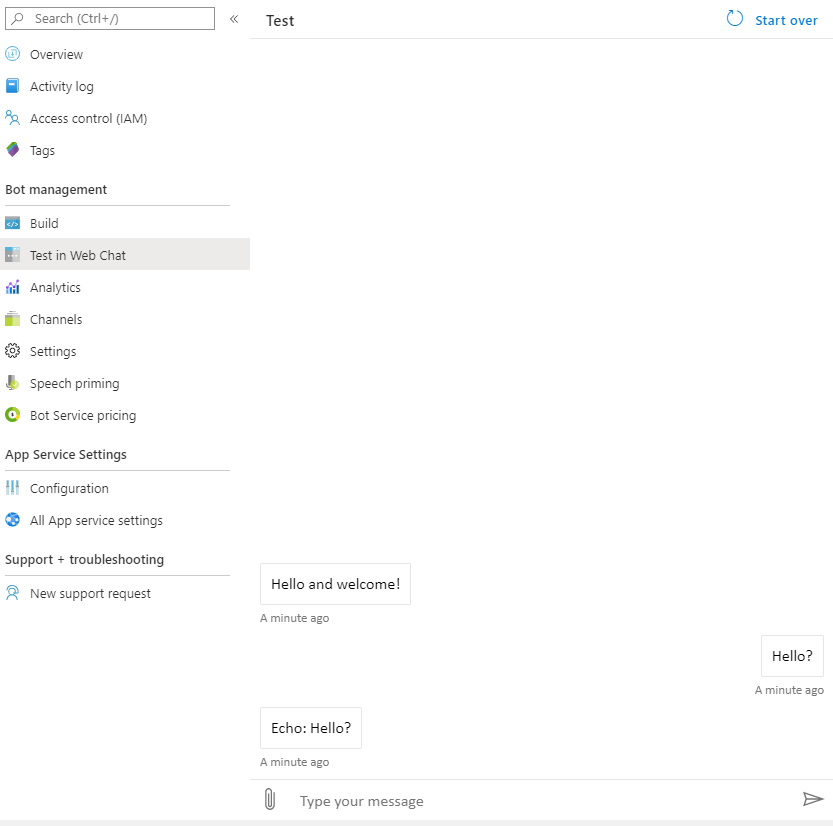
Great, the sample code is working! Now to link it to Teams.
Integrating with Teams
First off we have to tell the bot what channels we want to work with. These are the end-user messaging apps it’s going to work with. We’ve already seen it working with the testing web-chat channel.
To get started, click on the Channels option within the Web App Bot resource, then on the Teams icon. I’m not using the government cloud so I just leave the default options selected and click Save. Agree to the terms, and I’ve got my bot linked to Teams. Great! Now what?
Creating a Teams App Package
This is where it got confusing for me. In order to use by bot from Teams, apparently I have to create an app package for it. I think it’s the terminology that gets me here – I’m creating a bot, but now I have to create an app instead.
Once I decided to stop worrying about the words and get on with it though, it wasn’t too bad. I used the App Studio app in Teams to create the package with some basic details and add my bot to it. The key bit of information I needed here was the bot id (saved as the MicrosoftAppId in the Configuration section of the Web App Bot resource). All the other bot details were pulled in for me automatically after I entered this, which is very nice!
The other thing was to understand the scope of my bot. When you add the bot to the app package you have to select from Personal, Team or Group Chat scopes. In my case I think everyone is going to have their own personal conversations with the bot so I’m going to leave this on the default – Personal. I assume I can come back and change this later if I need to though.
Installing & Testing
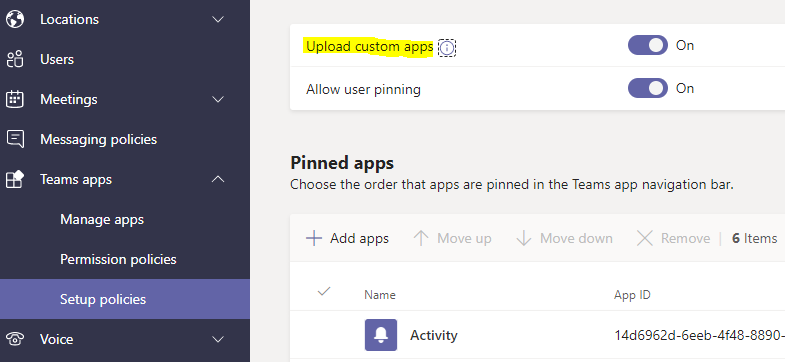
Now I’ve created my app package, I just need to install it. This is where I hit a bit of friction. I expected to be able to use the “Test and distribute” section within App Studio to do this, but I kept getting unhelpful permissions-related errors.
Eventually I found I had to enable an option in the Teams admin centre to let me do this. Under Teams apps > Setup policies, edit the relevant policy and turn on the “Upload custom apps” option.
Now the frustrating part – it still doesn’t work! Teams policies seem to take some time to apply, so come back to it later, go to App Studio and click that Install button again. If everything’s going smoothly your bot should now appear as a new app in the left hand menu, and you can start chatting to it in Teams!
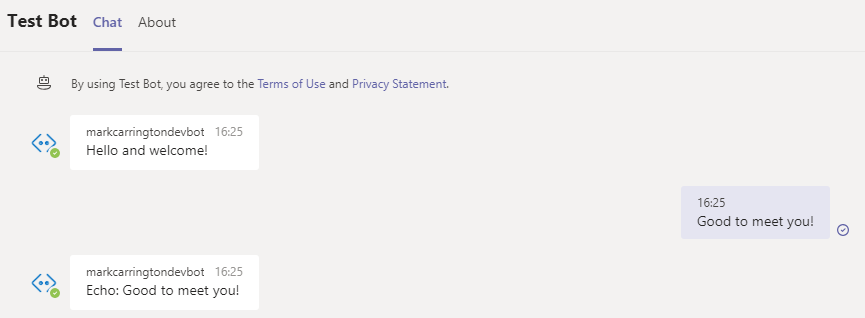
Hooray! I still haven’t written a single line of code, but I’ve got a fully operational bot that I can chat to from Teams. Brilliant!
That’s enough for today, next time I’ll take a look at how I can get my bot to push out messages to Teams rather than just respond when the user sends a message.
This is a great tool and exactly what we are looking for, but I’m running into trouble getting this working with the Azure changes since the blog was published.
Bots have moved to Azure Bot with a customer web app being separate under app services. I thought I followed as closely as I could even though some of the structure has changed in Azure.
Bot Services Deployed: Configuration –> Does anything go in to the Messaging Endpoint?
App Services –> Deployed the application , Test in Web chat does not work no matter what messaging endpoint used.
Enable Web Sockets in Config for App Service.
Create Storage.
Create Azure AD App. Give it graph permissions. Copy ID from Azure AD and create a Teams app. Paste the Azure AD ID into teams app, allow apps to be installed and deploy.
Create Teams channel in Bot Services and copy the secret.
Update config file in the app settings with the above secret, store connection string, APP ID from the Teams app created.
Give permissions to my Azure AD App in Dynamics environment.
Any information would be very helpful. Since the test in web chat isn’t even working, I feel I’m missing something obvious.